
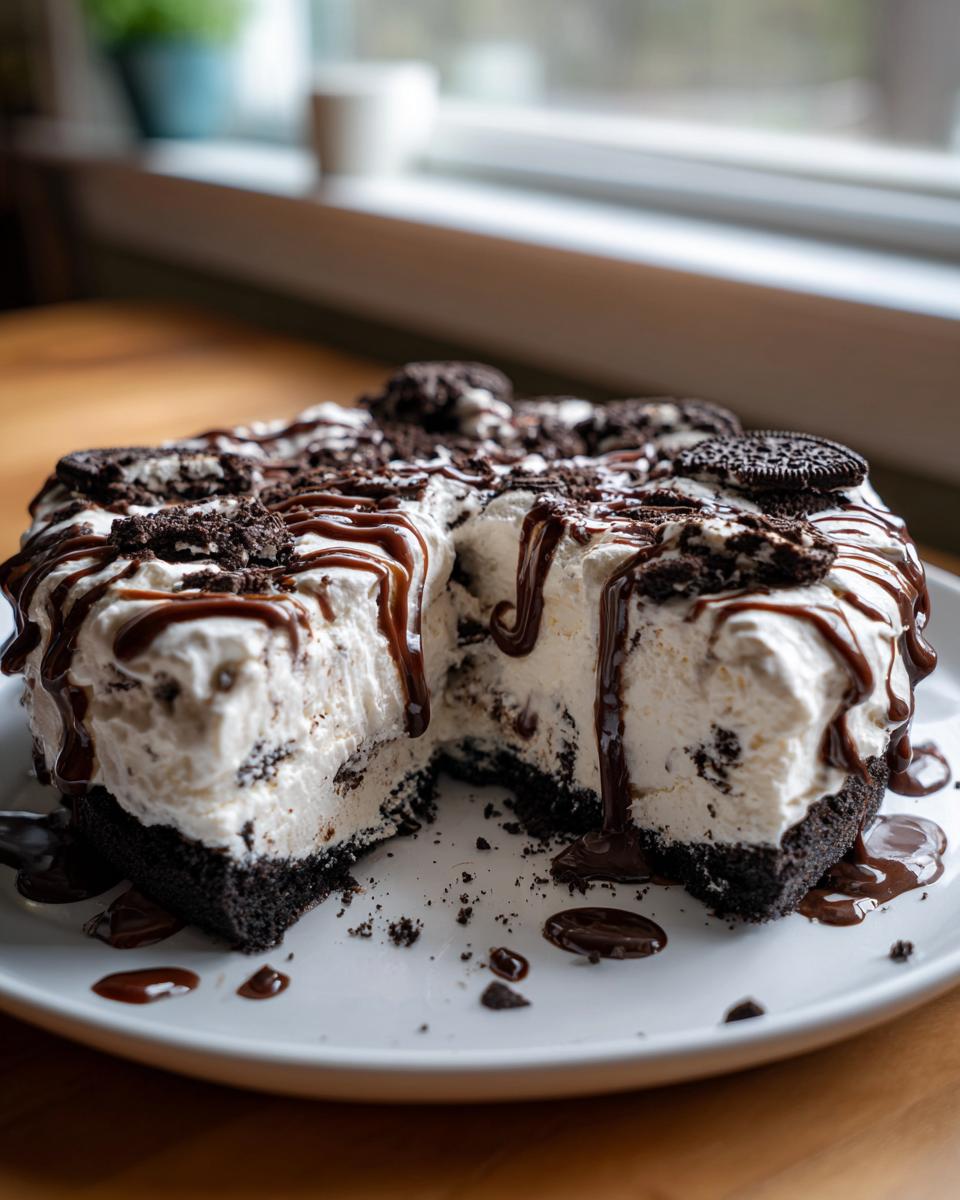
Is the heat already getting to you? I know it’s getting intense here in the Midwest, and when the temperature climbs, my desire to turn on the oven drops right down to zero. That’s why we rely on frozen desserts, and honestly, nothing beats the pure joy of a ice cream pie. This isn’t some complicated construction; this is the Ultimate No-Bake Oreo Ice Cream Pie, and it’s designed for real life. You get all that decadent, creamy flavor you crave for birthdays or just surviving a Tuesday, but it comes together faster than you can argue with your email inbox. The secret weapon, as you’ll see, is relying on store-bought magic for the base—a super sturdy, crunchy Oreo crust that lets you skip the oven entirely! Trust me, this is going to be your go-to summer treat.
- Why This Ultimate No-Bake Oreo Ice Cream Pie is Your New Favorite Summer Ice Cream Pie
- Gathering Ingredients for Your Creamy Frozen Pie
- Step-by-Step Instructions for the Easiest Ice Cream Pie Recipe
- Ingredient Notes and Substitutions for Your Ice Cream Pie
- Tips for Success with Your No Bake Ice Cream Pie
- Storage and Make Ahead Frozen Pie Instructions
- Frequently Asked Questions About Making an Ice Cream Pie
- Serving Suggestions for This Party Ice Cream Pie
- Estimated Nutritional Data for One Slice of Ice Cream Pie
Why This Ultimate No-Bake Oreo Ice Cream Pie is Your New Favorite Summer Ice Cream Pie
I want you to feel confident serving this pie, whether it’s for a huge family reunion or just for yourselves after a long day. When you need a showstopper dessert that doesn’t involve complex baking steps, this is it. I promise you, this ice cream pie delivers on flavor and ease!
- It’s truly no-bake! That means your kitchen stays cool, and you save precious time.
- The Oreo crust provides amazing texture—it’s crunchy, buttery, and holds up perfectly to the creamy filling.
- It’s infinitely customizable; you can swap the vanilla ice cream for almost any flavor you like for a completely different experience.
- It’s the ultimate party ice cream pie because it’s easy to make ahead of time and looks fantastic when sliced.
If you’re looking for quick meals to free up time for making desserts like this, check out my easy weeknight dinners collection!
Gathering Ingredients for Your Creamy Frozen Pie
Okay, the beauty of this ice cream pie is that you probably have most of this already! Since it’s a no-bake recipe, we aren’t fussing with flour or eggs in the main body of the pie—just pure frozen delight. When shopping, make sure your ice cream is just soft enough to spread but not actively melting. If you’re planning ahead, you can check out my tips for making your own homemade granola sometime!
For the Oreo Crust Ice Cream Pie Base
This part is foolproof; it’s just two things! Don’t buy the fancy stuff; the regular Oreos work like a charm here for that perfect crunch.
- 2 cups crushed Oreo cookies (Yes, you can use the whole cookie, cream and all!)
- 6 tablespoons unsalted butter, melted
For the Vanilla Ice Cream Filling and Topping
This is where the creamy magic happens. Remember, the ice cream needs to be just slightly softened—think 10 minutes on the counter, tops. That lets you spread it without tearing up your beautiful crust.
- 1.5 quarts (about 6 cups) vanilla ice cream, softened slightly
- 1 cup heavy whipping cream (make sure it’s cold!)
- 1/4 cup powdered sugar
- 1 teaspoon vanilla extract
- Optional toppings: chocolate fudge sauce, chopped peanuts, or fresh cherries
Step-by-Step Instructions for the Easiest Ice Cream Pie Recipe
See? I told you this was easy! You don’t need to be a fancy pie maker to create something spectacular. We are building layers, and each layer needs a quick chill stop to make sure this ice cream pie holds its shape perfectly when serving time comes. We’re taking this slow enough for confidence, but fast enough that you’ll be eating it before the sun sets! If you’ve got a sweet tooth after this, remember I have tons more amazing recipes waiting for you over at my dessert gallery.
Preparing and Chilling the Oreo Crust Ice Cream Pie Base
First things first, let’s build our crunchy floor. Mix up those crushed Oreos and the melted butter right in your 9-inch pie plate—no extra bowls needed if you don’t want the cleanup! Use the bottom of a measuring cup or your clean hands to really press that mixture down firmly and evenly along the bottom and slightly up the sides. If you skip this part, the crust will crumble when you slice later. Pop that whole thing into the freezer for a solid 30 minutes. It needs that chill time!
Layering the Ice Cream and Setting the Homemade Ice Cream Pie
Now for the main event! Take your vanilla ice cream out just long enough that it’s spreadable—I mean *slightly* softened, not soup! If it’s too hard, you’ll push right through your crust. Spread that creamy layer gently over your chilled Oreo base. Once it’s smooth, back into the freezer it goes. This layer needs serious time to firm up—plan for at least 2 hours, or until it’s rock solid before you move on to the topping.
Creating the Whipped Topping for Your Ice Cream Pie
While the pie is hardening up, let’s whip the clouds! I always put my bowl and whisk attachment into the freezer for about 10 minutes before I start. Seriously, cold metal makes the whipping cream fluff up faster and hold those stiff peaks better! Beat the heavy cream, powdered sugar, and vanilla until you see those sharp, firm peaks forming. Don’t overdo it, or you’ll end up with butter instead!
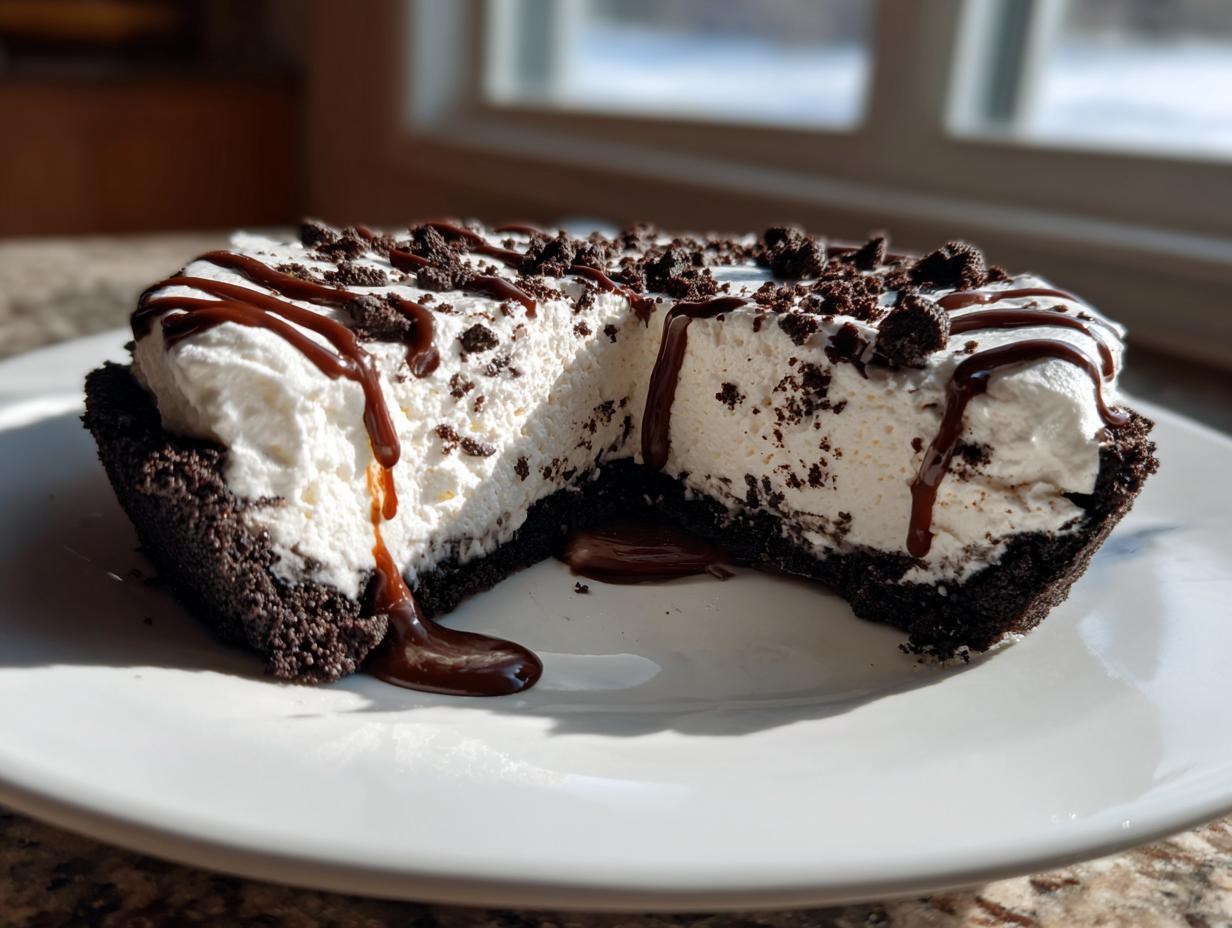
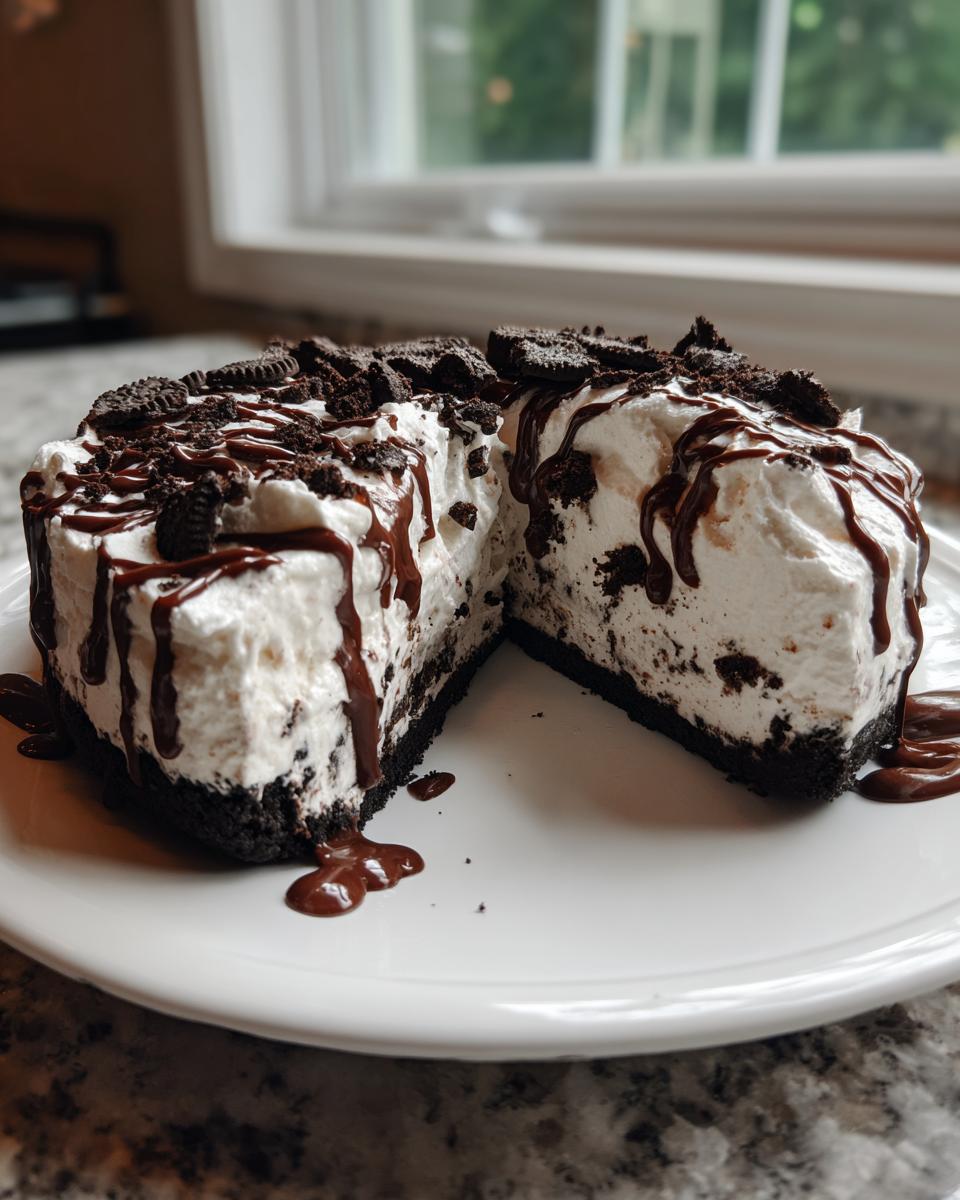
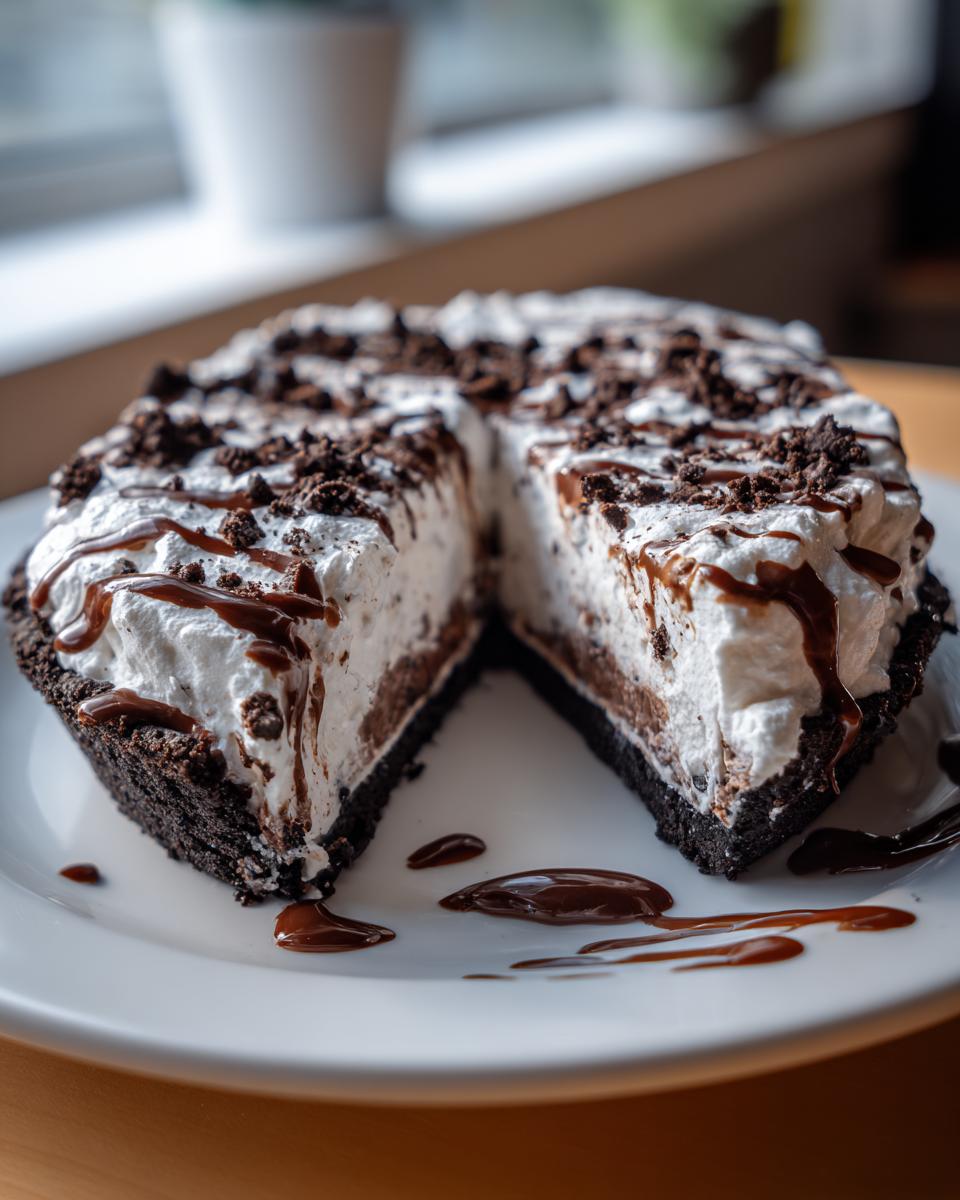
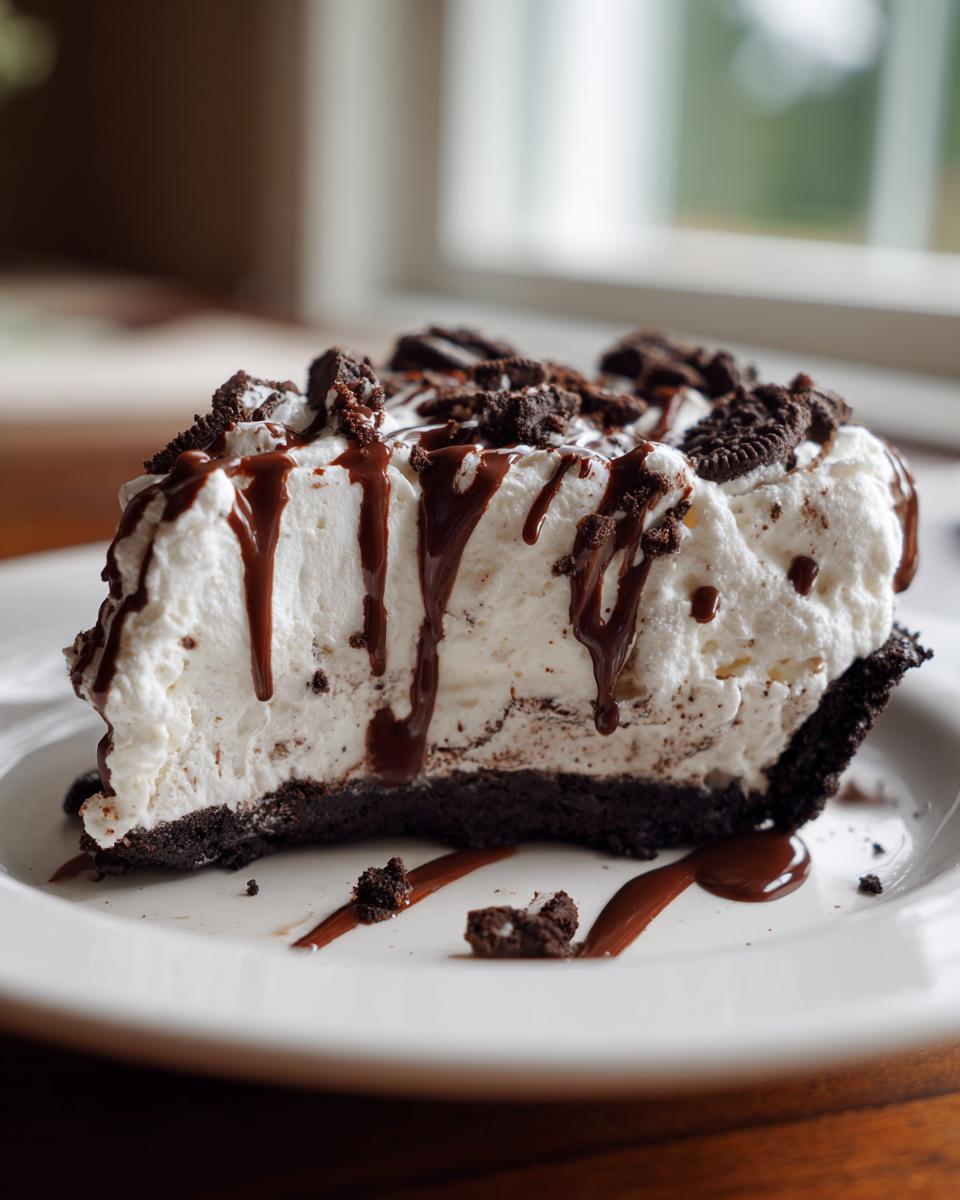
Assembling and Freezing the Final Ice Cream Pie
Once that ice cream layer is frozen solid, take the pie out. Gently spread your homemade whipped cream over the top. This is the fun part where you can totally personalize it! Drizzle on that chocolate fudge, sprinkle those peanuts—whatever makes your heart sing. Then, we wait one last time. The finished ice cream pie needs a minimum of 4 hours in the freezer. Seriously, aim for overnight if you can! That final freeze guarantees you get beautiful, clean slices for serving.
Ingredient Notes and Substitutions for Your Ice Cream Pie
One thing I learned in my quest to balance good food with a busy schedule is that flexibility is key! While I absolutely adore this vanilla ice cream pie, I know some of you might have other flavors calling your name, or maybe you’re missing Oreos (gasp!). Good news: this recipe is incredibly forgiving. If you want to try a chocolate ice cream pie or maybe even mint chip, go for it! Just make sure the texture when you spread it is the same—slightly soft.
Also, don’t stress if the Oreos aren’t available. My grandma wouldn’t have batted an eye at swapping ingredients when necessary, and you shouldn’t either! If you’re out of the chocolate sandwich cookies, you can easily manage with a graham cracker crust alternative. It’s a slightly different vibe, but still fantastic and easy to make ahead of time. Think of this as your base template for every ice cream pie you’ll ever need!
Speaking of great make-ahead ideas, you should definitely check out my recipe for whipped shortbread cookies—they disappear way too fast!
Tips for Success with Your No Bake Ice Cream Pie
Okay, we’ve made the crust, we’ve spread the ice cream, and we’ve whipped the topping. Now for the final hurdles—getting it out of the pan and making sure it sets up perfectly cold. These little tricks are what elevate my homemade ice cream pie from “good” to “I need the recipe right now!” I gathered these over years of tweaking, especially when I needed a quick dessert for a last-minute party.
Here are the non-negotiable tips I swear by for the best results:
- The Hot Water Trick for Easy Slicing: Don’t try to slice this pie straight from the deep freezer—you’ll shred the crust and ruin your pretty slices! Before serving, dip a sharp chef’s knife in a tall glass of hot tap water, wipe the blade dry, and then make your cut. Wipe and reheat the knife for every single slice. It sounds fussy, but it gives you beautiful, clean wedges!
- Pre-Slice Before the Final Freeze: If you know you’ll be serving this to a crowd, score the top lightly with your knife (but don’t cut all the way through the crust) before that final 4-hour freeze. It makes slicing adult portions much easier later on!
- The Hot Fudge Test: If you decide to use the chocolate fudge sauce as a topping, pour it on *before* the final freeze, but only in strategic dollops or stripes. If you cover the entire pie in room-temperature fudge, it can interfere with the whipped topping setting up completely firm. It’s better to drizzle it on individual slices if you want that syrupy look.
- Getting it Out of the Pan: Since we used a regular pie plate, you need a little help releasing this creamy frozen pie. After it’s completely frozen (final time!), take a clean, thin dish towel, soak it in hot water for about 30 seconds, wring it out nearly dry, and wrap it around the outside bottom and sides of the pie plate for about 45 seconds. This slight warming lets the edges release just enough so you can invert it onto a serving platter without a struggle.
If you’re looking for more amazingly simple fix-it ideas for your kitchen, I’ve got some surprisingly helpful tips in my post about making easy chili recipe—believe it or not, those organization tricks cross over!
Storage and Make Ahead Frozen Pie Instructions
This is truly the best make ahead frozen pie you’ll ever meet! Seriously, if you’re planning a weekend BBQ, you can make this entire thing on Wednesday and it’ll be just as good, if not better, by Saturday. Once you’ve finished the final freeze, you need to wrap it up tight. Use a layer of plastic wrap pressed right against the whipped topping, then cover the whole thing tightly with foil. This keeps freezer burn away!
Because it’s so rich, this ice cream pie keeps wonderfully in the freezer for up to two weeks. When it comes time to serve, pull it out about 15 minutes before you plan to slice it, just so it softens up slightly—remember that hot knife trick we talked about? That pre-softening time is crucial for perfect servings. If you love dessert prep, you absolutely have to check out my full guide on my favorite make ahead frozen pie techniques!
Frequently Asked Questions About Making an Ice Cream Pie
I get so many questions about how to adapt this recipe, especially since everyone has their own favorite flavors lurking in their freezer! It’s one of the best things about an ice cream pie—it just begs for personalization. I wanted to address the most common things people ask me about making their own creamy frozen pie.
Can I use a graham cracker crust instead of Oreos?
Oh, absolutely you can! If you prefer that buttery, slightly softer texture, it works beautifully as a ice cream pie with graham cracker crust. You’ll just need about 1.5 cups of graham cracker crumbs mixed with a little sugar and melted butter—I detailed the amounts in the notes section above, but trust me, it’s just as quick! It’s a great alternative if you want a slightly less chocolatey base.
How do I stop my ice cream pie from turning into soup when serving outside?
This is the eternal enemy of the summer ice cream dessert! Since this is a no bake ice cream pie, it will melt faster than hard-packed tub ice cream. My secret is setting up a very short ‘serving station.’ Have your plates and forks ready *before* you slice. Get that pie onto a chilled platter (I keep mine in the freezer until the last second) and work quickly. If you’re at a BBQ, keep the pie in a cooler packed with ice until it’s time to cut.
Can I substitute the vanilla ice cream for a different flavor, like chocolate?
Yes! Please jump right in! If you want a rich chocolate ice cream pie, swap the vanilla for chocolate. Want something bright? Try cherry swirl! The only thing you need to watch is the consistency. If your substitute ice cream is super hard when you take it out, let it sit just a little longer than the vanilla would need to soften up enough to spread flatly over that crust.
Is this a good dessert to serve at a party?
It is the *best* party ice cream pie! Because it’s a total make ahead frozen pie, you never have to worry about dessert the day of the event. I often make two at a time—one vanilla and one peanut butter for variety—and keep them wrapped tight in the freezer until the big day. It always impresses everyone!
If you’re planning your full menu, don’t forget to look at my tips on making easy lasagna with ricotta—a great hearty meal before such a sweet finish!
Serving Suggestions for This Party Ice Cream Pie
Now that you’ve mastered the ultimate ice cream pie, the next question is, what do you serve alongside it? Since this dessert is so rich and satisfying, you don’t need a million sides! It really shines when paired with something that offers a light, bright contrast to cut through that creamy sweetness. I always think about balancing the richness, especially after a big BBQ gathering.
For a simple coffee finish, a strong, high-quality espresso or a nice dark French roast cut the heavy chocolate and cream perfectly. If you want to keep the dessert spread going but lighten the load after this decadent pie, I highly recommend a simple, fresh fruit salad on the side. Think bright berries, maybe some sliced kiwi—anything that pops! You can find some ideas for lighter sipping to go along with your meal in my recipe for fall sangria, which I swear tastes good even in the summer!
If you’re making this for a bigger spread, especially for celebrations, make sure you have a few contrasting textures available. Maybe some crispy, salty pretzel rods on the side for people who want an extra crunch alongside their slice. Honestly, though, once people see this impressive party ice cream pie, nothing else on the table will matter much anyway!
Estimated Nutritional Data for One Slice of Ice Cream Pie
I always feel a little funny sharing exact numbers because, let’s be honest, when you’re eating a glorious no bake ice cream pie, you aren’t doing it for the macros! These figures are definitely just estimates based on the ingredients list I provided, and they can swing wildly depending on the brand of ice cream you use or how heavy-handed you are with that optional fudge sauce. Use this more as a guideline than a hard and fast rule.
I usually ignore the numbers and focus on the happiness factor, but for those of you who track things, here’s the snapshot for one slice:
- Serving Size: 1 slice
- Calories: 450
- Sugar: 35g
- Sodium: 320mg
- Fat: 28g
- Saturated Fat: 16g
- Unsaturated Fat: 12g
- Trans Fat: 0.5g
- Carbohydrates: 45g
- Fiber: 2g
- Protein: 6g
- Cholesterol: 60mg
A quick note on these numbers: Because we’re using full-fat cream for that beautiful homemade topping and relying on the sweetness from the cookies and ice cream, the sugar and fat content will naturally be higher. Everything in moderation, right? Don’t let this stop you from enjoying this wonderful frozen dessert!
PrintUltimate No-Bake Oreo Ice Cream Pie
Make this easy, no-bake ice cream pie using an Oreo crust. This recipe delivers a creamy, frozen dessert perfect for summer gatherings or family celebrations.
- Prep Time: 20 min
- Cook Time: 0 min
- Total Time: 4 hours 20 min
- Yield: 8 servings 1x
- Category: Dessert
- Method: No-Bake/Freezing
- Cuisine: American
- Diet: Vegetarian
Ingredients
- 2 cups crushed Oreo cookies
- 6 tablespoons unsalted butter, melted
- 1.5 quarts (about 6 cups) vanilla ice cream, softened slightly
- 1 cup heavy whipping cream
- 1/4 cup powdered sugar
- 1 teaspoon vanilla extract
- Optional toppings: chocolate fudge sauce, chopped peanuts, or fresh cherries
Instructions
- Prepare the crust: Combine the crushed Oreo cookies and melted butter in a bowl. Press the mixture firmly into the bottom and up the sides of a 9-inch pie plate. Freeze the crust for at least 30 minutes while you prepare the filling.
- Fill the crust: Spread the slightly softened vanilla ice cream evenly over the chilled Oreo crust. Return the pie to the freezer and freeze for at least 2 hours, or until the ice cream is firm.
- Make the topping: In a separate bowl, beat the heavy whipping cream, powdered sugar, and vanilla extract with an electric mixer until stiff peaks form. This creates your whipped topping.
- Assemble the pie: Spread the homemade whipped cream over the frozen ice cream layer.
- Decorate and freeze: Drizzle with chocolate fudge sauce, sprinkle with chopped peanuts, or add fresh cherries, if desired. Freeze the finished pie for at least 4 hours, or until completely firm, before slicing and serving.
Notes
- For a different flavor, substitute the vanilla ice cream with your favorite flavor, such as chocolate or mint chocolate chip.
- If you prefer a graham cracker crust, substitute the Oreos with 1.5 cups of graham cracker crumbs mixed with 1/4 cup sugar and 6 tablespoons melted butter.
- This is a great make-ahead frozen dessert; it keeps well in the freezer for up to two weeks.
Nutrition
- Serving Size: 1 slice
- Calories: 450
- Sugar: 35g
- Sodium: 320mg
- Fat: 28g
- Saturated Fat: 16g
- Unsaturated Fat: 12g
- Trans Fat: 0.5g
- Carbohydrates: 45g
- Fiber: 2g
- Protein: 6g
- Cholesterol: 60mg