
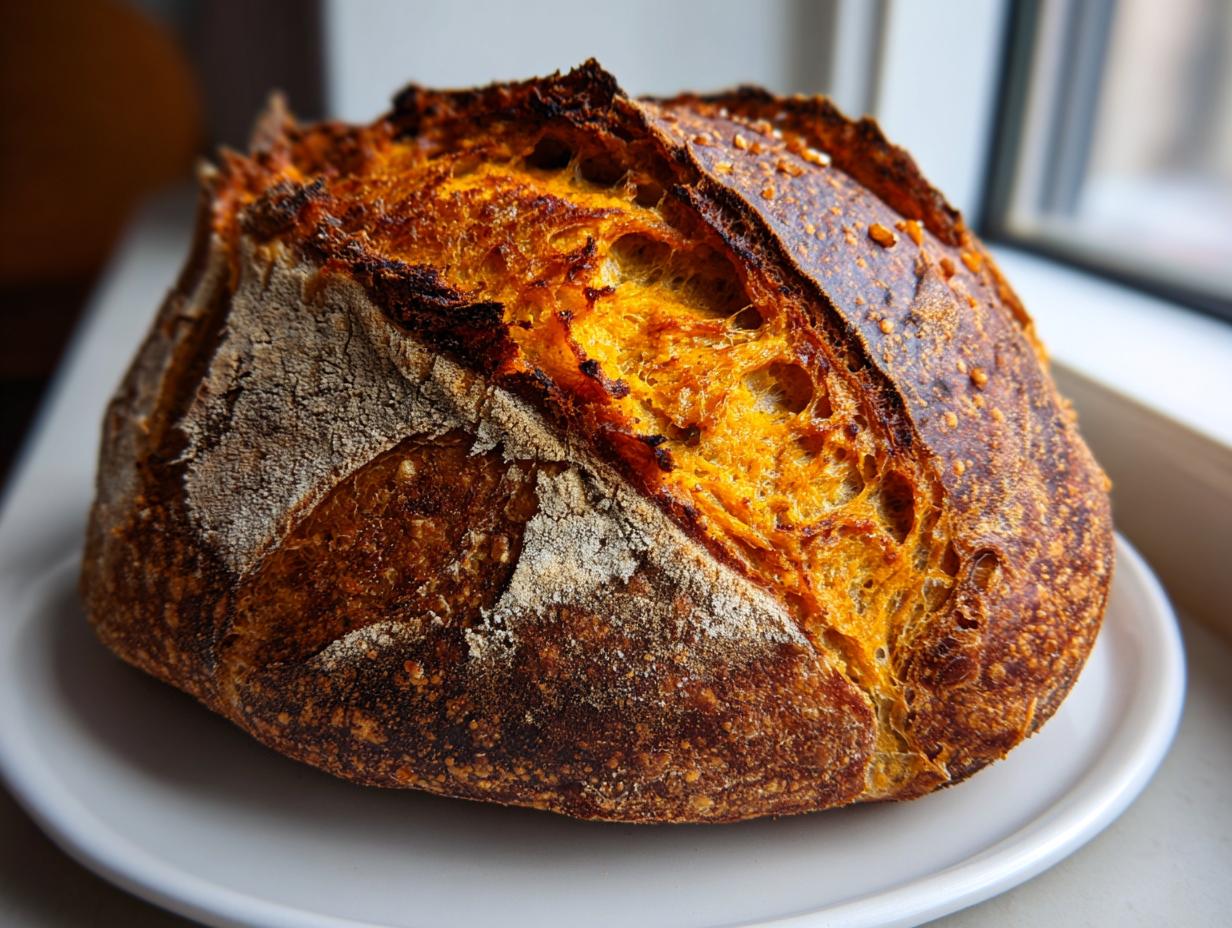
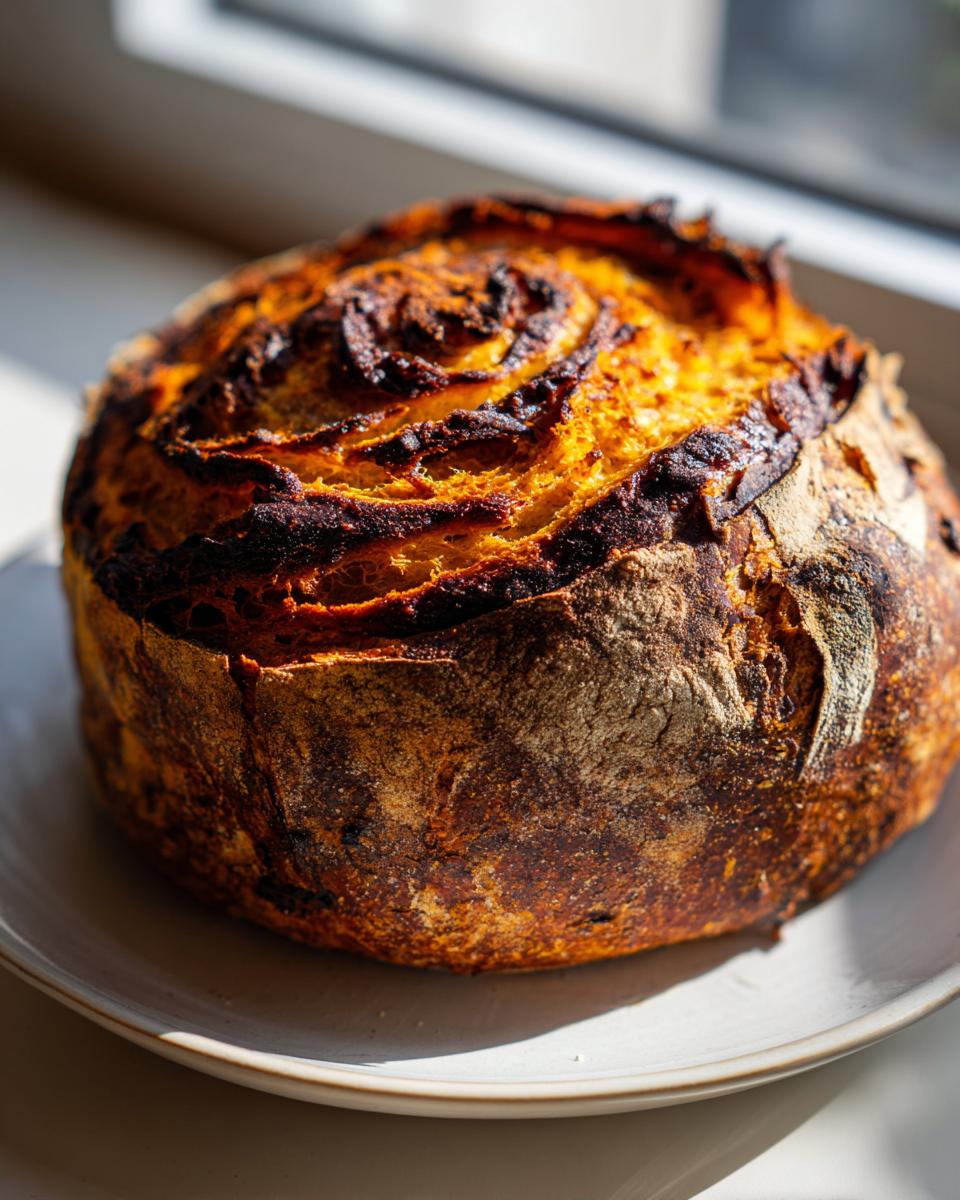
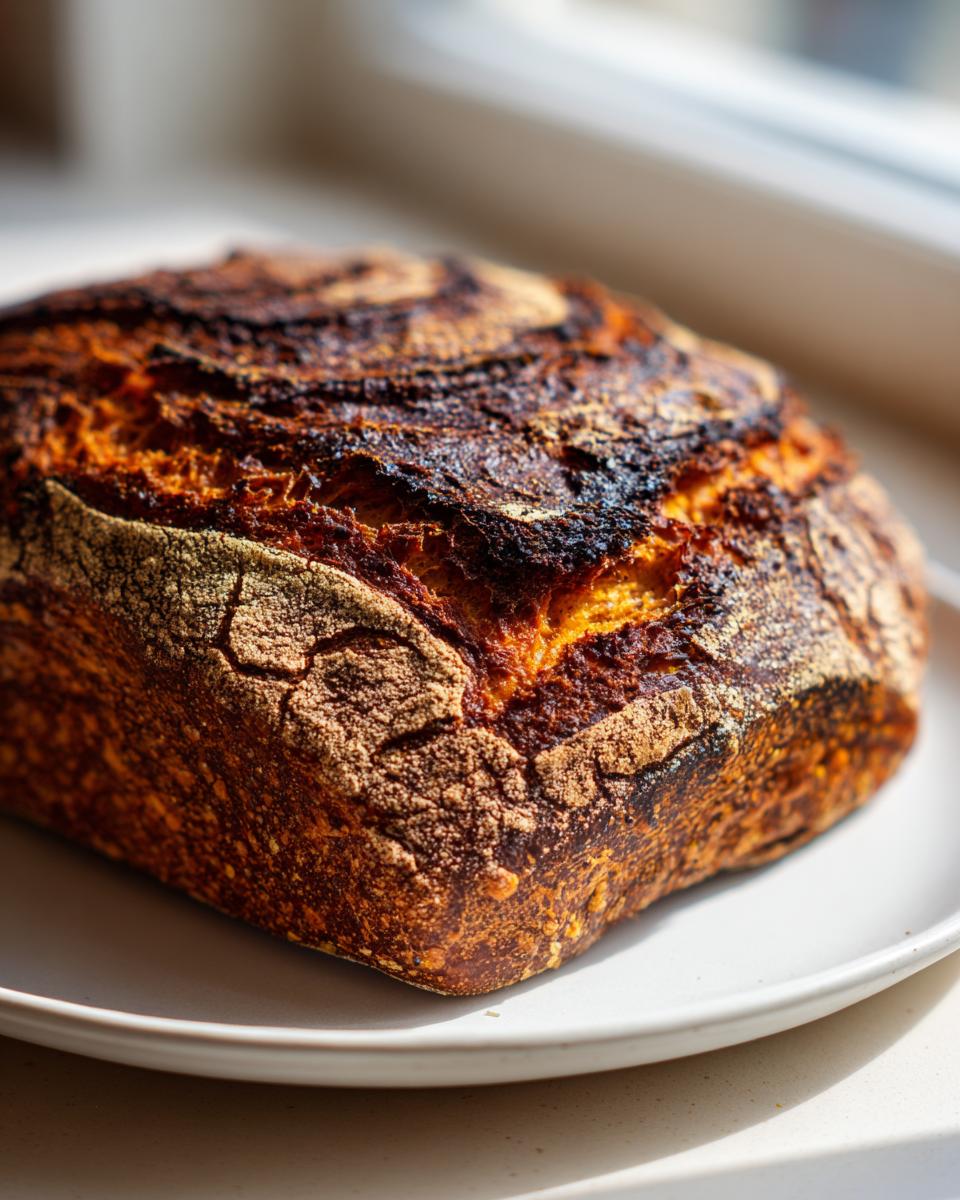
When the air finally smells crisp, and you start digging out those favorite oversized sweaters, that’s my cue to head straight for the spices—cinnamon, nutmeg, the works! For me, fall baking isn’t about complicated techniques; it’s about creating comfort that fits into our real, busy lives. That’s why I developed this ultimate **pumpkin sourdough** loaf. It gives you that incredible, rustic, artisan look you crave, but trust me, the process is straightforward enough for a weeknight after work. We take those deep, cozy autumn flavors and use natural leavening to create a bread that is unbelievably moist. It truly proves my point: genuinely delicious food doesn’t have to be complicated. If you want to see the heart of how we approach cooking here at the blog, you can always read a bit more about our philosophy over on the About Page!
- Why This Artisan Pumpkin Bread is Your Best Fall Sourdough Baking Choice
- Ingredients for Your Homemade Pumpkin Sourdough Loaf
- Essential Equipment for Baking Pumpkin Sourdough
- How to Prepare Your Rustic Sourdough Pumpkin Loaf
- Tips for Perfect Pumpkin Sourdough Starter Baking
- Ingredient Notes and Substitutions for Your Pumpkin Sourdough
- Storage & Reheating Instructions for Leftover Pumpkin Sourdough
- Frequently Asked Questions About Natural Leavening Pumpkin Recipes
- Share Your Cozy Autumn Baking Experience
Why This Artisan Pumpkin Bread is Your Best Fall Sourdough Baking Choice
So, why should this specific pumpkin sourdough recipe be the one you choose when all the fall flavors start calling your name? Simple: it delivers on texture and looks gorgeous without needing a culinary degree. I’ve worked hard to make sure this loaf is something you can successfully pull out of your Dutch oven and feel proud of. It hits all the right notes for cozy autumn baking.
- It has that rustic, beautiful artisan look we all love, making any breakfast feel special.
- The tangy sourdough character is perfectly balanced by the sweetness of the pumpkin.
- It stays surprisingly fresh for days, thanks to the natural additions.
Achieving the Perfect Moist Pumpkin Loaf Texture
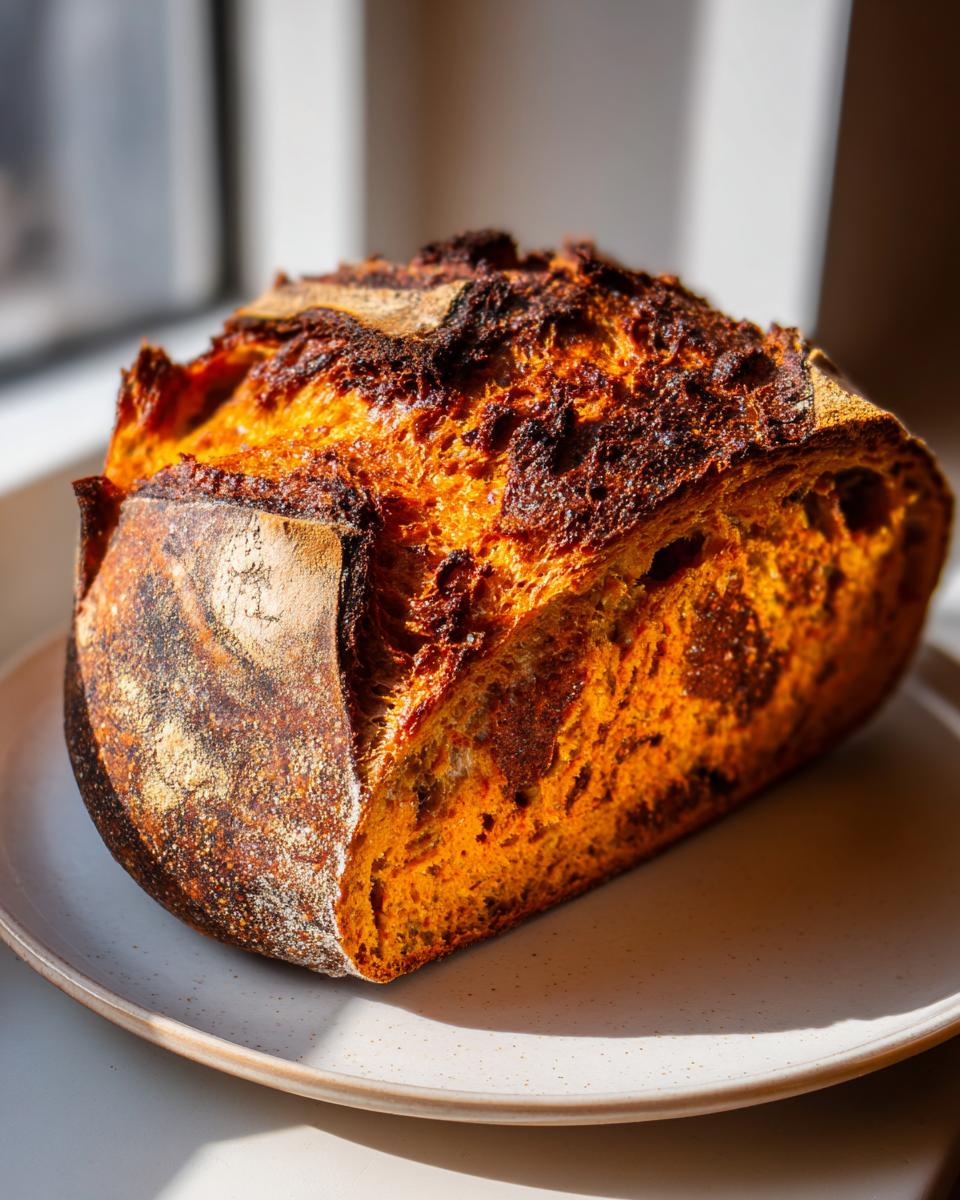
The secret to that moist pumpkin loaf texture isn’t just the pumpkin puree—though that helps—it’s the careful blend of flours and the way the puree integrates during the initial mix. We avoid the dry, crumbly texture you sometimes get with quick breads by using that sourdough hydration. It creates a dough that behaves beautifully during fermentation, guaranteeing a tender crumb indoors.
The Magic of Cinnamon Swirl Sourdough
Listen, if you’re already putting in the effort for an artisan bake, you might as well go all out! Adding the cinnamon sugar swirl elevates this from great bread to a showstopper. Imagine slicing it open and seeing that gorgeous, deep brown ribbon winding through the orange-tinged crumb. That swirl takes your loaf straight to holiday levels of cozy autumn baking!
Ingredients for Your Homemade Pumpkin Sourdough Loaf
Okay, gathering your ingredients is where we build the foundation for that incredible pumpkin sourdough. This is where the trust factor comes in—I need you to be precise here, especially with the pumpkin! We want that deep flavor, not too much extra liquid from pie filling. If you’re looking for quick morning sides to go with this amazing bread, you might want to bookmark my quick breakfast recipes.
Dough Components
For the main body of our rustic sourdough pumpkin loaf, make absolutely sure your starter is active and bubbly. It needs to be ready to work! We need that natural leavening power for the best lift.
- 100g active sourdough starter (fed recently and hungry!)
- 350g warm water (just cozy, not hot)
- 500g bread flour (your main structure builder)
- 100g pumpkin puree (and please, use 100% pure pumpkin, not the filling!)
- 50g whole wheat flour (just a touch for depth)
- 10g fine sea salt
For the Cinnamon Swirl Filling
This swirl is optional, but honestly, if you’re making this loaf, you should absolutely do the swirl. It makes the whole experience much more decadent.
- 50g brown sugar (dark is best for maximum molasses flavor)
- 1 tablespoon ground cinnamon
- 25g softened unsalted butter (you need it soft so you can spread it easily!)
Essential Equipment for Baking Pumpkin Sourdough
Before you even think about mixing that starter, let’s get your tools ready. Trust me, having everything staged beforehand makes tackling a more involved bake like this pumpkin sourdough so much less stressful. This isn’t a quick mix-and-bake situation; it’s a process! Preparation is half the battle, especially when you’re aiming for that beautiful, rustic sourdough look.
You don’t need a ton of fancy gadgets, but a few specific items really make achieving that perfect artisan pumpkin bread crust a snap. If you don’t have a kitchen scale, you should look into getting one—it’s the single best upgrade you can make to your baking game, period!
- A trusted Kitchen Scale: For accurate measurements, especially with starter and flour. Baking is chemistry, after all!
- A Large Mixing Bowl: You need room to work in the dough during your stretch and folds.
- A Dutch Oven (Cast Iron Preferred): This is non-negotiable for that classic, crackly crust and fantastic oven spring we want in our homemade sourdough pumpkin loaf.
- A Proofing Basket (Banneton): Lined, of course! This helps your dough hold its shape during that long, cold proofing phase.
- A Bench Scraper: Essential for moving that slightly sticky dough around once it’s developed strength.
How to Prepare Your Rustic Sourdough Pumpkin Loaf
Alright, let’s get down to the actual baking of this pumpkin sourdough. This is the part where you get to see your ingredients transform—it takes patience, but trust me, the payoff is worth standing around the counter for. Since we’re developing strength over time, this whole process respects your busy schedule. We need steady, gentle handling to create the perfect structure for how to bake pumpkin sourdough that looks fantastic. If you’re looking for quick meals to pair with this amazing bread later in the week, check out my easy weeknight dinners section!
Mixing and Initial Dough Development
First things first, we wake up the starter! Mix your active starter right into the warm water until it loosens up. Then, just dump in all your flours, the pumpkin puree, and that salt. Don’t mix it gently at first; we’re just trying to combine everything until it looks like a messy, shaggy cloud. Cover it up and let it chill out for 30 minutes for the autolyse. That resting time lets the flour drink up the water. After that, we start building strength with four sets of stretch and folds, making sure to give the dough 30 minutes between each set.
Incorporating the Cinnamon Swirl
This is my favorite part! Once your final set of folds is done, turn the dough out onto a lightly floured surface. Gently flatten it into a working rectangle—don’t punch all the air out! Now, take that softened butter and spread a thin layer right over the dough. Then, sprinkle your cinnamon and brown sugar evenly across the butter. Roll that rectangle up tight, like you’re rolling a jelly roll, making sure that swirl stays put. That’s the key to a great cinnamon swirl sourdough!
Proofing and Oven Preparation
Now the dough needs its long nap. Dust your proofing basket heavily with rice flour—this is vital to stop sticky pumpkin dough from clinging for dear life. Tuck that swirled loaf seam-side up inside and cover it. It needs 12 to 18 hours in the fridge for a nice, slow, cold proof. While it’s chilling overnight, get your Dutch oven preheating in the oven at 500°F—it needs a full hour to get scorching hot.
Baking the Fall Flavor Bread
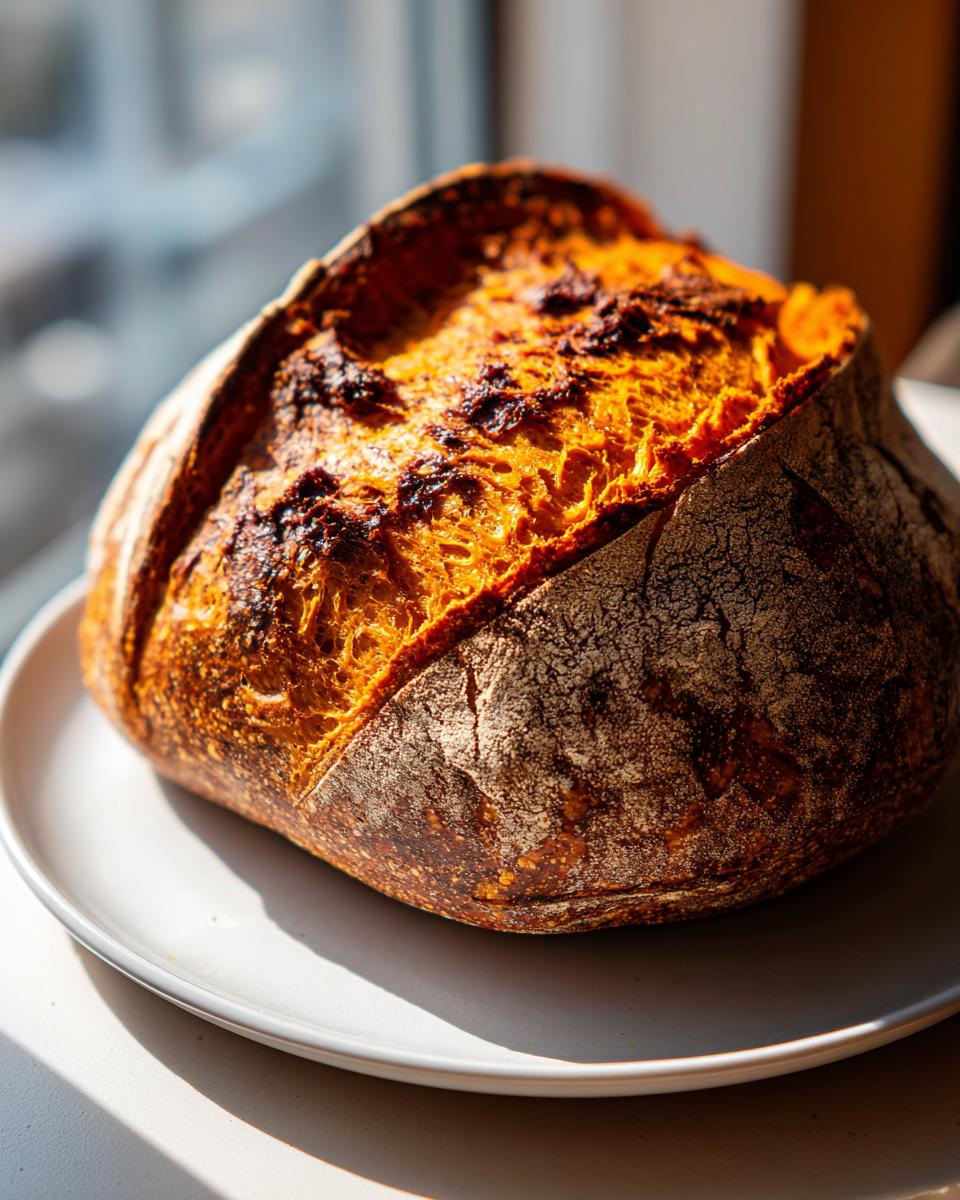
When the hour is up, carefully take out that blazing hot Dutch oven. Gently flip your cold dough onto parchment paper and score the top—a quick slash or two lets your fall flavor bread expand nicely. Using the parchment as a sling, lower the loaf into the hot pot, cover it, and bake for 20 minutes at 500°F. Then, drop the heat down to 450°F, take the lid off, and let it roast for another 25 to 30 minutes until that crust is deep and gorgeous. Let it cool completely, or you’ll mess up that lovely crumb. I’m always so eager to slice it, but resist the urge!
Tips for Perfect Pumpkin Sourdough Starter Baking
Baking with pumpkin puree adds so much flavor and richness, but it does change how your dough behaves. If you’ve ever felt like your pumpkin sourdough starter dough was running away from you or getting way too sticky during the folds, you’re not alone! These little tips are what separates a good bake from a truly amazing, artisan loaf.
My absolute number one non-negotiable rule, which I mentioned before, is the pumpkin itself. Do not, under any circumstances, substitute the pure pumpkin puree for pumpkin pie filling. That filling is loaded up with sugar and spices, which messes with the beautiful, tangy balance we are trying to achieve with natural leavening. Think of the puree as just another wet addition that needs careful measuring.
Secondly, let’s talk about sticking. Pumpkin dough is notorious for being a little more tacky than your standard white flour dough. That’s okay! We counter that stickiness with rice flour in the proofing basket. While bread flour is great for structure, rice flour has almost no gluten and repels moisture, which is exactly what we want between the dough and the basket during that long overnight rest. Trying to scrape a wet, sticky pumpkin sourdough loaf out of a regular flour-dusted basket is a recipe for tears, trust me.
Also, keep an eye on your bulk fermentation temperature. Because the puree adds a little density, the dough might take a touch longer to feel jiggly and alive before it goes into the cold proof. Don’t rush the stretch and folds just because the clock says 30 minutes are up; wait until you actually feel that dough building strength. It’s about feeling the dough, not just watching the timer!
If you’re looking for other flavor additions—maybe pairing this lovely loaf with something sweet for breakfast—my recipe for homemade granola is fantastic sprinkled right on top before baking, or just used in a bowl alongside a slice of the warm bread.
Ingredient Notes and Substitutions for Your Pumpkin Sourdough
I know many of you fantastic bakers out there are sitting on a jar of bubbly, sleepy sourdough starter discard and thinking, “What else can I make with this?” Well, sometimes you can incorporate it, but for this particular pumpkin sourdough loaf, I really want you to focus on using active, happy starter if you can swing it.
When we use active starter—that means it’s been recently fed and is at its peak activity—we get those beautiful air bubbles and the structure we need to support the weight of the pumpkin. It gives you a better oven spring and a lighter texture overall. This recipe is built around the expansion power of a fed starter.
Using Sourdough Starter Discard Instead
Now, if your starter is weak or you only have discard on hand, you can try substituting. But here’s the catch for this homemade sourdough pumpkin loaf: discard has less life in it, so you’ll need to adjust your hydration. Because you are taking out 100g of active starter, you should probably add about 50g less water to the initial mix to compensate for the lower hydration of the discard. It might still be a tiny bit dense, but it will still taste amazing! You’re trading some loft for the benefit of using up your discard. It’s a trade-off I’m willing to make sometimes when I’m trying to empty the fridge before vacation.
Flour Tweaks and Ratios
In our recipe, we stuck with 500g of bread flour and 50g of whole wheat flour. If you are feeling adventurous, you can push that whole wheat flour up to 75g, which will give your final artisan pumpkin bread a slightly more rustic structure and deeper color. But absolutely do not swap out all the bread flour for whole wheat; this loaf needs that high-protein bread flour to hold up the moisture from the puree.
If you needed to use all-purpose flour because that’s what you have, you can do it, but you might lose some volume. Try to stick to bread flour for that perfect chew. Remember, simple ingredients made well are the heart of our philosophy here!
Storage & Reheating Instructions for Leftover Pumpkin Sourdough
Oh, the glorious (and rare) occasion when you actually have leftover pumpkin sourdough! Because this moist pumpkin loaf recipe has so much natural moisture from the puree, it keeps much better than a standard sourdough boule. But still, we need to treat it right so it stays tender and doesn’t dry out.
If you cut into that beautiful loaf and realize you won’t finish it within two days, get it wrapped up immediately. I swear by the dual-layer wrap method for any bread I want to keep tasting like it just came out of the oven. You want to maintain all that yummy moisture we worked so hard to keep locked in!
Storage Techniques for Maximum Freshness
For short-term storage—say, three days max—keep it simple. Wrap the entire cut side of the loaf tightly in plastic wrap first. Then, wrap the whole thing again in aluminum foil or pop it into a large zip-top bag, pressing out as much air as possible. Storing it on the counter is fine as long as your kitchen isn’t overly humid or hot.
If you know you won’t touch the rest of that artisan pumpkin bread for a week or more, you absolutely need to use the freezer. Slice the loaf first! Freezer burn happens on the surface, so slicing gives you individual pieces whose cut sides can be protected.
Wrap each slice very tightly in plastic wrap, then slide those wrapped slices into a heavy-duty freezer bag. I always try to label the bag with the date, though honestly, I rarely remember to look at it! It keeps perfectly for up to three months. Having frozen slices is wonderful for those sudden cravings.
How to Revive Your Slices
Reheating is key to bringing that fresh-baked taste back, especially if you’re using a frozen slice. Forget the microwave for this delicate loaf; it’ll just make it tough!
- Toasting: For a single slice, the toaster is your friend. It gets the crust slightly crisp while warming the inside.
- Oven Reheat (Best for larger portions): Wrap a few slices gently in foil. Pop them into a 300°F oven for about 8 to 10 minutes. The foil traps the steam, rehydrating the crumb perfectly.
- A Touch of Butter: No matter which method you choose, once it’s warm, slather it with butter. If you’re feeling fancy, a smear of homemade blueberry jam on top of that warm slice is pure heaven. It just reinforces the cozy vibe of this fall sourdough baking project!
Frequently Asked Questions About Natural Leavening Pumpkin Recipes
I get so many questions about this loaf—it’s a popular one! That’s totally understandable because adding pumpkin to a sourdough starter takes things to a delicious new level. Here are the answers to the things I hear most often about making this pumpkin sourdough.
Can I use sourdough starter discard instead of active starter?
Yes, you certainly can use your sourdough starter discard recipes! But listen up, because this matters: if you use discard instead of active starter, you’re using flour and water that isn’t actively creating gas. For this specific loaf, I really prefer the active starter because the pumpkin adds density, and we need that powerful leavening lift. If you must use discard, you will need to reduce your overall hydration slightly—maybe cut back on that initial 350g of water by 50g or so. You might find your rise isn’t quite as dramatic, but the flavor will still be there!
What is the flavor profile of this sweet and tangy bread?
People sometimes worry that adding sweetness or pumpkin spice will completely mask the sourdough tang, but that doesn’t happen here! This is why I love this combination so much—it’s the definition of a sweet and tangy bread profile. The long, cold ferment of the dough gives you that wonderful, subtle sourness in the background, which acts like a beautiful counterpoint to the warm pumpkin spices and the sweetness of the brown sugar in the swirl. It’s complex, comforting, and definitely not cloyingly sweet!
How do I get a good oven spring on my pumpkin sourdough?
For a good oven spring on any enriched dough like this pumpkin sourdough, temperature is everything. Make sure your dough is slightly warmer than you might usually let it get before it hits the fridge for the cold proof—the ambient temperature of the kitchen during bulk fermentation matters a lot. But the biggest physical trick is your scoring! When you score the cold dough before putting it in the Dutch oven, make one confident, deep slash (about half an inch deep) right down the middle. That single, decisive cut gives the loaf a clear path to expand rapidly when it hits that steam, helping you avoid a flat top. If you want to see some great starter tips beyond this recipe, check out some of the suggestions on this site I found!
If you’re looking for other ways to use up your starter, I have a ton of ideas over on my simple lunch recipes page that might inspire you next!
Share Your Cozy Autumn Baking Experience
That’s it! You’ve done the work, you’ve nurtured the dough, and now you just pulled a glorious, fragrant, pumpkin sourdough loaf out of your oven. I mean, wow! Doesn’t your kitchen smell like the coziest spot on earth right now? That spiced aroma is really the best part of cozy autumn baking, isn’t it?
Now my favorite part starts: seeing how you all made this recipe your own! Whether you got that perfect cinnamon swirl winding through the middle, or if you decided these were better as hearty sourdough pumpkin rolls—I want to see it!
Don’t keep all that beautiful artisan pumpkin bread to yourself! If you make this loaf, please leave me a rating right here on the page. A little star review lets me know that the recipe is working hard for all of you busy cooks out there. Even better, snap a picture and tag me on social media! Seeing your rustic sourdough pumpkin loaf makes my day.
If you have absolutely any questions that popped up while you were developing that dough, or if you found a trick that made the folding easier, please drop a note in the comments below. Connecting right here is the best way to build our community of seriously good, simply made food. If you need to reach out directly for ordering or other kitchen inquiries, you can always find my contact details here. Happy baking, everyone!
PrintMoist Artisan Pumpkin Sourdough Bread with Cinnamon Swirl

Bake this moist pumpkin sourdough bread using your sourdough starter. This recipe delivers a rustic, artisan loaf with warm pumpkin spice flavor and an optional decadent cinnamon swirl, perfect for cozy autumn baking.
- Prep Time: 30 min
- Cook Time: 50 min
- Total Time: 13 hours 20 min
- Yield: 1 loaf 1x
- Category: Breakfast
- Method: Baking
- Cuisine: American
- Diet: Vegetarian
Ingredients
- 100g active sourdough starter
- 350g warm water
- 500g bread flour
- 100g pumpkin puree (not pie filling)
- 50g whole wheat flour
- 10g fine sea salt
- For the Swirl: 50g brown sugar
- For the Swirl: 1 tablespoon ground cinnamon
- For the Swirl: 25g softened unsalted butter
Instructions
- Mix the active starter and warm water in a large bowl until combined.
- Add the bread flour, whole wheat flour, pumpkin puree, and salt to the bowl. Mix until a shaggy dough forms.
- Perform a 30-minute autolyse period, covered.
- Perform four sets of stretch and folds, spaced 30 minutes apart, to build dough strength.
- If making the swirl, mix the brown sugar and cinnamon in a small bowl.
- After the final set of folds, gently flatten the dough into a rectangle. Spread the softened butter over the dough, then sprinkle evenly with the cinnamon-sugar mixture. Roll the dough tightly into a log shape.
- Place the dough seam-side down in a proofing basket dusted heavily with rice flour.
- Cover the basket and cold proof the dough in the refrigerator for 12 to 18 hours.
- Preheat your oven to 500°F (260°C) with a Dutch oven inside for one hour.
- Carefully remove the hot Dutch oven. Gently turn the cold dough out onto a piece of parchment paper. Score the top of the loaf as desired.
- Carefully lower the dough (using the parchment paper as a sling) into the hot Dutch oven. Cover the pot.
- Bake covered for 20 minutes at 500°F (260°C).
- Reduce the oven temperature to 450°F (232°C). Remove the lid and continue baking for another 25 to 30 minutes, until the crust is deep golden brown.
- Remove the bread from the Dutch oven and cool completely on a wire rack before slicing.
Notes
- Use pure pumpkin puree for the best flavor and moisture content in your loaf.
- Rice flour prevents the sticky dough from adhering to your proofing basket during the long cold fermentation.
- This recipe works well with sourdough starter discard if you adjust the hydration slightly, but using active starter yields a better rise.
Nutrition
- Serving Size: 1 slice
- Calories: 320
- Sugar: 8g
- Sodium: 350mg
- Fat: 5g
- Saturated Fat: 2g
- Unsaturated Fat: 3g
- Trans Fat: 0g
- Carbohydrates: 60g
- Fiber: 3g
- Protein: 10g
- Cholesterol: 0mg